57 Camaro

Once the body was assembled the body work could begin. Most of the work to be done is at the rear bumper and trunk lid. The overlaps between the fenders and rear bumper at the side of the trunk opening were cut off at the point they aligned best. About 4” to either side of the seam between the bumpers and fenders the gel coat was roughed up. 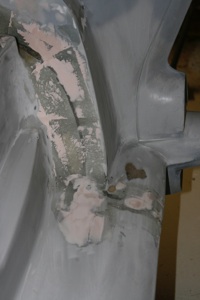 The backside near the seam was also roughed up. The seam was reinforced with the supplied fiberglass matting, one piece on the backside and two layers on the top surface. The area that was cut at the sides of the trunk opening were also roughed up and reinforced. Once the resin had cured it was sanded as level as possible with out going through it. Then for areas with large gaps a fiber reinforced filler was used to build them up. A air operated long board was used to sand across the seams so they would blend with the bumper profile. Once the profile was close regular filler was used to fill the remaining low spots. Filler was also used at the sides of the trunk opening to smooth the surface. The front bumper / fenders received a similar treatment.
 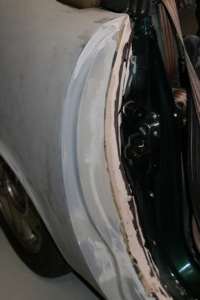 The door jams were blended a little by sanding first then finished with several applications of filler.
The upper and lower door edges where the panels meet the door needed to be blended. Prior to being put on the back side was sanded down to reduce the thickness at these edges. Once the panel adhesive was fully cured the top and bottom edge of the panels were sanded further. It was still necessary to use fiber reinforced filler followed by regular filler to completely blend the door and panel.
The various holes left from the screws temporarily used to hold the panels in place while the adhesive cured were filled. 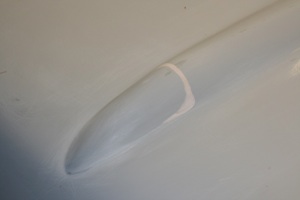 The molded cutouts on the hood were filled after roughing up the surface a bit so the bumps would be seamless with the hood.
Once the obvious areas were filled and blended the entire body was sanded with 180 grit on a long board. This will reveal any low spots on the body that need to be filled. Generally the body panels were smooth with very few low / high spots. The biggest exception being where screws were used the surrounding area was low. Other areas needing attention was the “chrome” on the top of the rear fins. During manufacturing something shifted on one side and the chrome was missing a corner. The other side had a void that was revealed while sanding. Both were repaired with a small amount of filler. The other area that needed some help were the bullets on the front bumper. 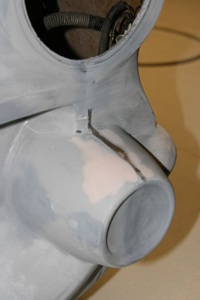 They should be round but both have a flat spot that once painted would be revealed. Several sequences of applying filler and carefully sanding improved the shape significantly.
Once the preparations were complete the tires were re-installed and the car dropped back on the ground for a quick test drive and check that everything worked and nothing interfered with normal use.  One thing to be checked is the clearance between the rear tires and fenders. They clear with the stock tire size but may be a problem with wider rims / tires. The top portion of the tire is covered by the fender not exposed like on the Camaro.
  To remove a tire the BODY must be lifted not just rear axle. The entire car was blown off with air then washed with a mild dish detergent and water. The whole exterior, under the hood and trunk and door jams were all washed.
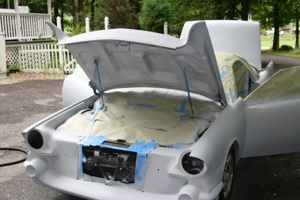
 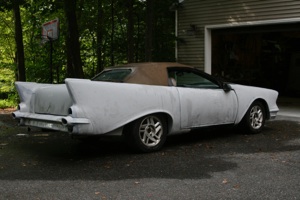 This removed most of the dust, some oil and hand prints prior to masking off the car. Once washed care is taken to not touch where paint will be applied while masking or removing trim before spraying the primer. I choose to leave the doors, hood and trunk attached for painting because I will be using a metallic base coat which if not sprayed exactly the same direction and under the same conditions it will appear a different color.
 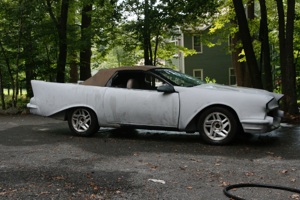 So if I am going to spray the finish coat with everything together I might as well do the same for the primer. This means the doors, trunk and hood have to be openable while spraying to get color everywhere needed.
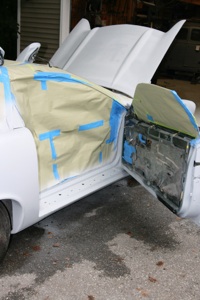
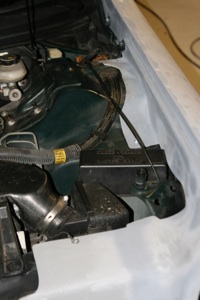
 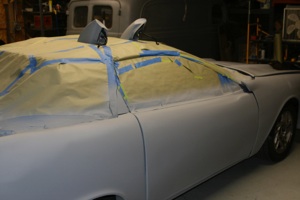 The masking has to protect the interior but still allow the doors to open. The engine bay has to be masked as will various parts of the trunk.