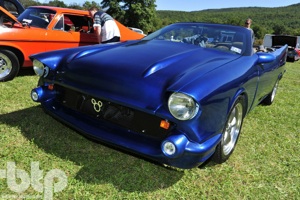
57 Camaro


Several hours after the last coat of clear was applied the masking was removed cleaning and reassembly began. The interior had been exposed during most of the project and was caked in fiberglass dust. While I started on reassembling the car my wife, Rhodi got the interior looking better than before the project started. She even reinstalled gaskets, trim and door panels! I mounted and wired the front turn signals from a motor cycle under the headlights. Next standoffs were reattached so the grill could be installed. The car is registered in New Jersey and being too new to get historic plates it has to have a plate installed on the front. The bumper is too low to mount it there so it had to go on the grill -- a bit ugly but I will make it removable for when not driving the car. The headlight buckets took a bit of fiddling with, the first one I installed was at the wrong angle... I didn’t know the bulbs only fit in a few positions and it had to be rotated. The side view mirrors went back on... don’t tell Rhodi I had to remove the door panels to install them... she had done a great job getting them back on. The rear lights required some modification to get the sockets to fit in. It would have been much easier to modify them BEFORE adhering them in to place on the car. The sockets have 3 tabs that have to fit through slots on the housings... except one tab is much wider then the others. I installed red LED taillights. The Belaro kit came with 4 clear plexiglass lenses and there really isn’t much of a reflector unless you line the housing with aluminum foil. The red LEDs faced directly out and were the right color. The socket on the passenger side for the taillight did have to be extended by a coupe inches to reach the upper position. My kit came with 4 lenses... but there are 6 openings. I am not sure if I was missing a couple or they need to be purchased elsewhere so they are red. The rear license plate was mounted in the middle of the rear bumper since the twin exhaust tips I installed prevented it from going to one side (and hiding a blemish on the bumper)
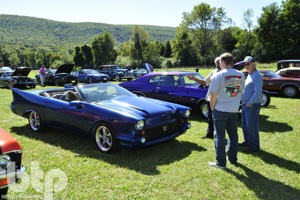
We took the car out to a local cruise night and burgers and fries for dinner. I had chance to look at a couple 56 / 57 Chevys to see how some details are handled on the originals. I found that my turn signals weren’t flashing and the head lights were not pointed quite right on the way home. The ABS IN OP dash warning light was on too.
The turn signal problem turned out to be that the flasher didn’t like the LED tail lights. The Camaro had 4 parking lights at the rear, 2 of which were also brake lights / turn signals. I chose to make all four turn signals / brake lights by replacing two of the sockets and wiring the signal wire to the other sockets. I installed 2 more red LED bulbs. The flasher was exchanged with a heavy duty electronic one that would flash no matter how many bulbs were installed. The ABS IN OP light was on because the 3rd brake light was still missing -- it got cut off when the rear spoiler was cut apart. Temporarily I hooked the wires up to a relay coil until I can design and fabricate the custom light for the trunk lid. Three inch diameter fog lights were installed in the recesses of the bullets.
Besides the custom trunk light, the car still needs wheels to match the style of the car, the Camaro wheels just don’t look right. Defects in the clear coat need to be wet sanded then the car buffed out so the metallic flakes can really shimmer. A couple pesky problems remain -- a washer fluid bottle and pump need to find a home. The car I saw at the Carlisle show had it installed exactly where my ABS unit is. There just isn’t much room under the hood. The air intake currently draws air from behind the blocked area of the grill so the air must come up from under the bumper to get to it. It I had noticed it before the front fenders were on I could have easily modified the radiator support, fender / grill. Now it will have to be done from the engine side. I will have to look at the cold air intake kits that are available.